

APIs in Android: Understanding the Backbone of Modern Software
Table of Contents
What is an API?
API stands for Application Programming Interface. It’s a set of rules and protocols, that allow different software applications to communicate and interact with each other.
How do APIs work?
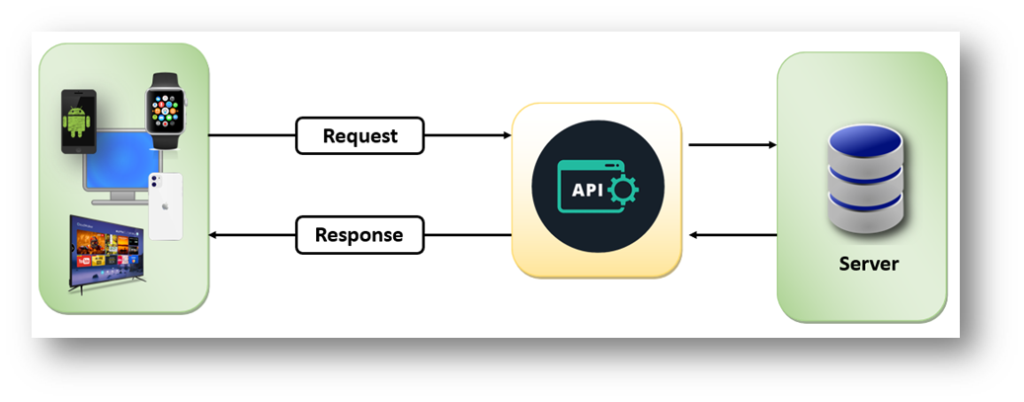
APIs work by sharing data between applications, systems, and devices. This happens through a request and response cycle. A user initiates a request for data by interacting with an application. The request is sent to the API, which retrieves the data and returns it to the user.
To understand this process better, check out how Google Maps works on apps like Ola, Uber, Zomato, and Swiggy. This app allows you to track the location of your order using the map feature. Additionally, these apps do not have their own satellites to track your location through the map.
So how do these apps get their maps?
The apps get their maps from the Google Maps system.
These apps don’t access Google Maps data directly because Google adds a layer of security called the Google Map API.

So, when Swiggy wants to retrieve data, it first talks to the Google Maps API instead of talking to the Google Maps directly. Therefore, an API can be said to be a messenger that transfers data from one application to another.
When Swiggy needs data, it talks to the API and Instructs it to, “Ask the system if it is allowed to provide the required data.”Next API asked to server, Is it wanted to send the data to Swiggy. If the Server permits, data will be sent to Swiggy( from server to API and API to Swiggy). If the server does not allow this, the API will return an error.
Note: API will just tell only “what” not “how” of the system.
If an app requires the Hamburger, the app will return a fully cooked hamburger, not a hamburger recipe.
API keys/authentication
In the app, we have seen the signup with Google, and signup with Facebook options the main purpose behind these types of options is,
This work has already been done by big databases of Google and Facebook
If someone builds a new app then he will not check and verify that the credential of each user is correct or not instead they will asked to check Google and Facebook through Google API and Facebook APIs to if this valid user exits in your database or not if present, app will give entry else denied this login.
The question arises,so that anybody could misuse the data?
To solve this API introduces a different type of security layer through the API key.
API key is the security code that is given by the system to a developer who wants to access their API.
Some APIs are free to use means there is no API key but most APIs have the API key, Some API keys are free and some are paid to those who want invaluable data.
Therefore, the benefits that the API provides to the system are:
- Monitor
- The request is not a nonsensible
- Cant allow to send unlimited requests.
- Not able to do illegal activity because the activities are tracked and monitored by the API key
- Security (no app can directly access the data of the system)
Why would we need an API?
APIs serve several crucial purposes in software development, including in Android development:
- Functionality Integration
- APIs allow developers to integrate functionalities from other software or services into their own applications without having to build everything from scratch.
- For example, integrating a weather API into a weather app saves time and resources compared to creating a weather data collection system.
- Accessing External Services
- : APIs allow applications to interact with external services, such as social media platforms (Facebook, Twitter), payment gateways (PayPal, Stripe), mapping services (Google Maps), weather data providers, and more.
- Enhancing User Experience
- APIs can enhance user experience by providing access to features that otherwise would be complex or time-consuming to develop.
- For instance, integrating Google Maps API to provide navigation within an app improves user experience by leveraging familiar and robust mapping functionalities.
- Security and Control
- APIs provide controlled access to specific features or data, allowing developers to define how much access is granted to external services or applications.
- This control helps maintain security by limiting access to sensitive information and functionalities
What are the different types of APIs?
There are many different types of APIs and ways to categorize them.
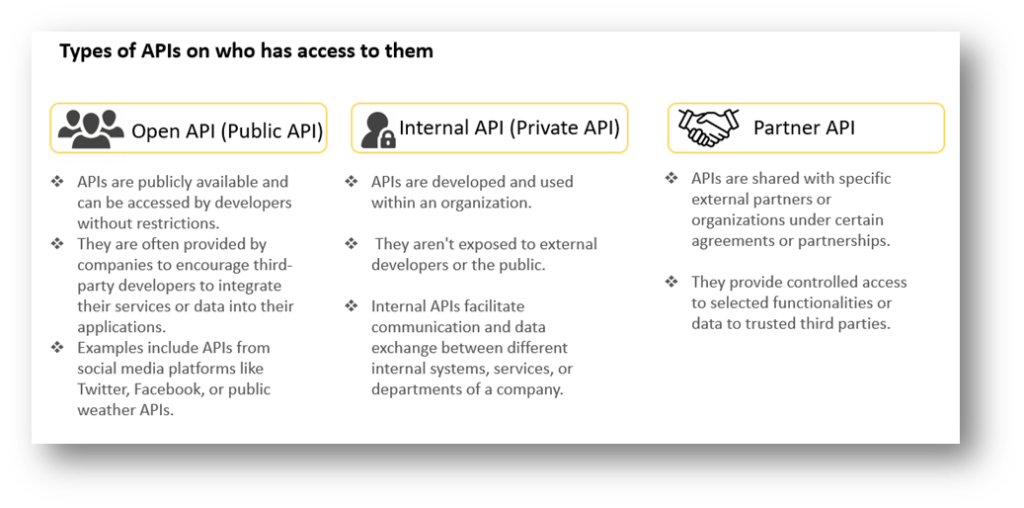
- Categorization of APIs by who has access to them.
2. Categorization of APIs according to their architectural style, of which there are many. The most frequently used architectural styles are:
- RESTful APIs (Representational State Transfer
- Representational State Transfer (REST) APIs follow the principles of REST architecture.
- They use standard HTTP methods (GET, POST, PUT, DELETE) for data manipulation and typically use JSON or XML for data exchange.
- REST APIs are commonly used for web services due to their simplicity and scalability.
- SOAP APIs (Simple Object Access Protocol)
- SOAP APIs use XML as their message format and rely on other protocols like HTTP, SMTP, or TCP for message transmission.
- They are more rigid and standardized compared to REST APIs, often used in enterprise-level applications due to their robustness and features like security and transaction handling.
- GraphQL APIs
- GraphQL is a query language for APIs that allows clients to request only the specific data they need.
- Unlike REST APIs where the server determines the data structure, in GraphQL, the client specifies the structure of the response.
- This results in more efficient data retrieval and reduced over-fetching.
- Web APIs
- These are APIs that are accessible over the web using standard web protocols like HTTP.
- They can include RESTful APIs, SOAP APIs, or other types of APIs that can be accessed via web URLs.
- Library-based APIs
- Some APIs are provided as software libraries or SDKs (Software Development Kits) that developers can directly integrate into their applications to access specific functionalities or services.
- For example, Android provides APIs to access device features like cameras, sensors, or location services.
Rest API Implementation Steps in Android
Implementing a REST API in an Android app involves several steps. Here’s a general outline of the process.
- Understanding the API:
- Read the API documentation thoroughly to understand its endpoints, request methods (GET, POST, PUT, DELETE, etc.), request parameters, response format (JSON, XML), authentication methods,
- Setting Up Networking Library:
- Select a networking library to handle API requests. Popular options include Retrofit, Volley, OkHttp, etc. Retrofit is commonly used due to its simplicity and ease of use.
- Add Dependencies:
- If using a third-party library like Retrofit, include the necessary dependencies in the build.gradle file.
dependencies {
    // Retrofit for handling API requests
    implementation 'com.squareup.retrofit2:retrofit:2.9.0'
    implementation 'com.squareup.retrofit2:converter-gson:2.9.0' // Gson converter for JSON serialization/deserialization

    // For coroutines support
    implementation 'org.jetbrains.kotlinx:kotlinx-coroutines-android:1.5.2'
}
4. Permissions:
- Ensure that your app has the necessary permissions to access the internet. Declare the INTERNET permission in the AndroidManifest.xml file if not done already:
5. API Testing:
- Before the integration of API app developers need to check from their own side is API working or not to test API mostly using Postman.
- Postman is a widely used API development environment that allows users to create, test, and document APIs. It offers a user-friendly interface for making requests, testing endpoints, setting up automated tests, and generating documentation.
- Postman is a plugin in Google Chrome, and it can be used for testing API services.
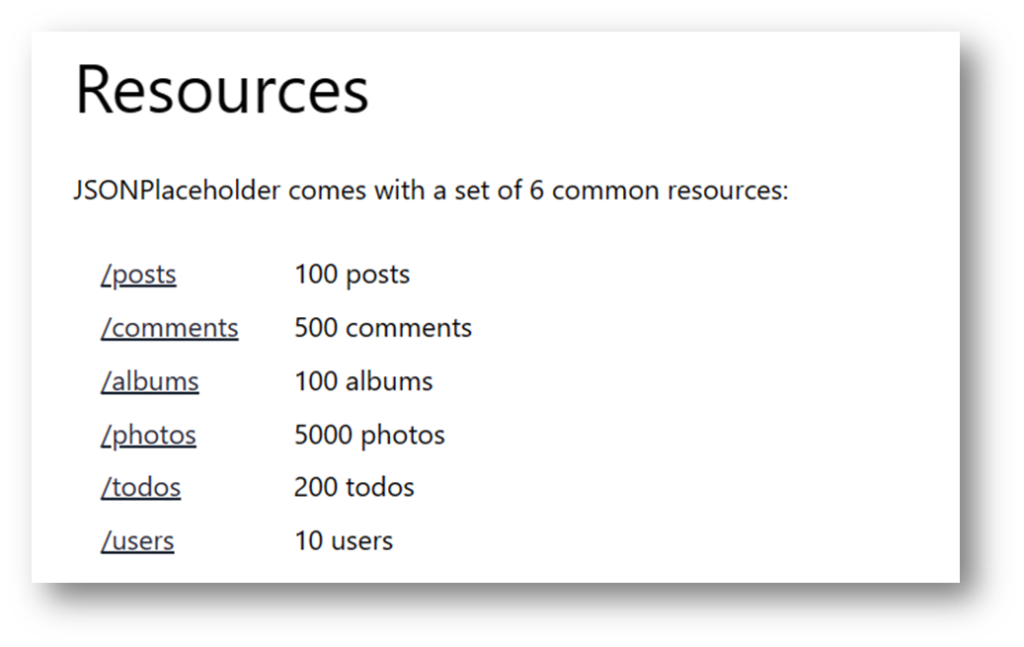
- Get the testing API from JSONPlaceholder – Free Fake REST API (typicode.com)
- JSON placeholder is a fake REST API that is very famous among developers to test their applications.
- Go to the resources section and select one of the resource options. I am selecting post-resource API.
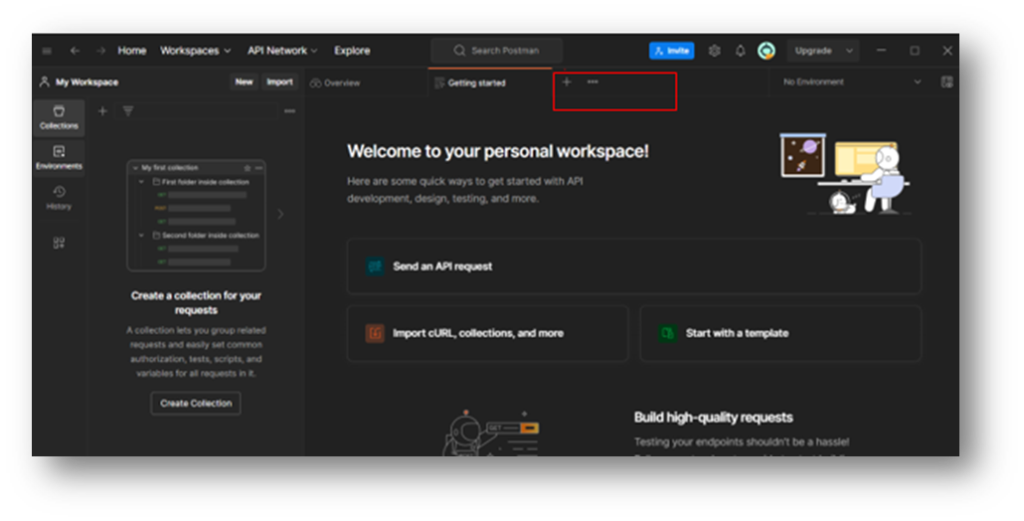
Download link: https://www.postman.com/downloads
- After installing Postman do the required formalities and click on add icon.
- There are multiple annotations selected according to your needs.
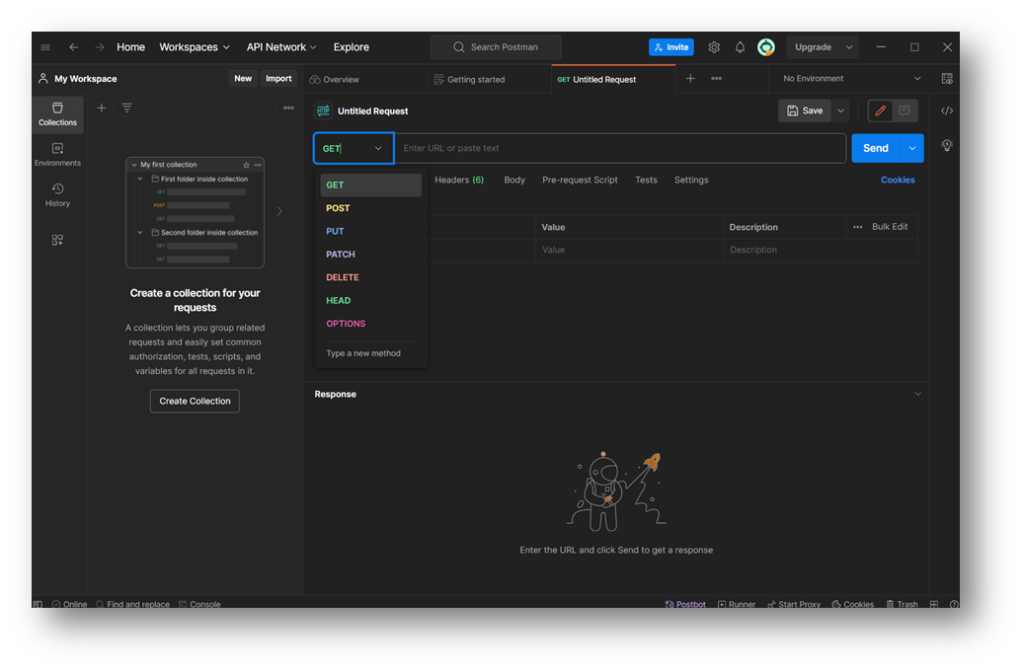
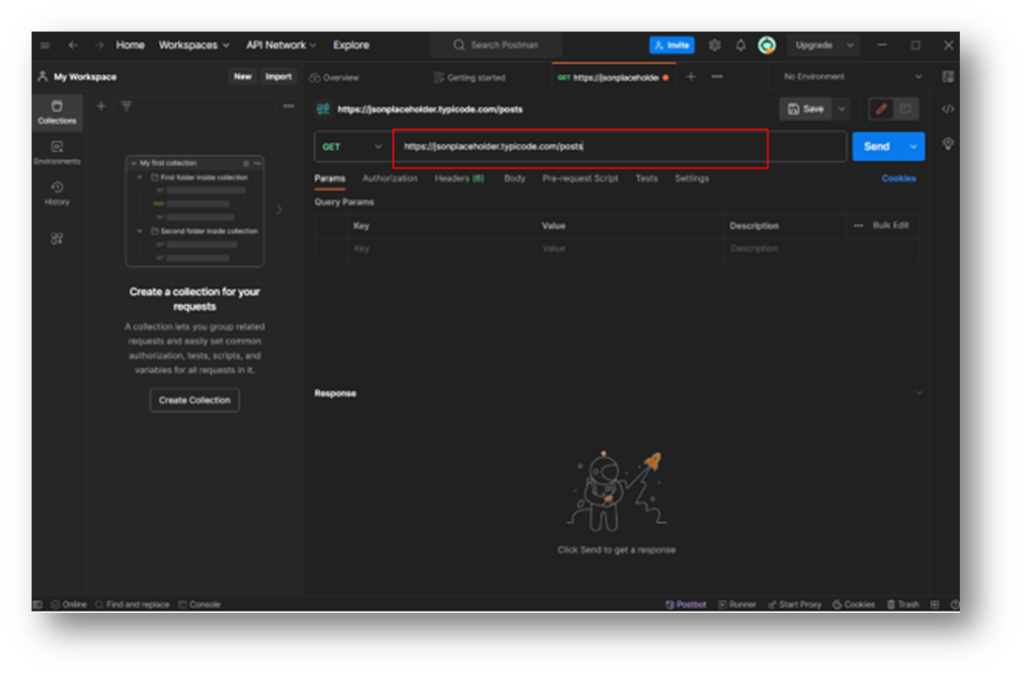
- If just want to test what data are coming via API, Select GET annotation and enter the API URL https://jsonplaceholder.typicode.com/posts keep the Params option selected, and then send the request by clicking the send button.
- The server just accepts your request and returns you a data in the form of JSON as a response.
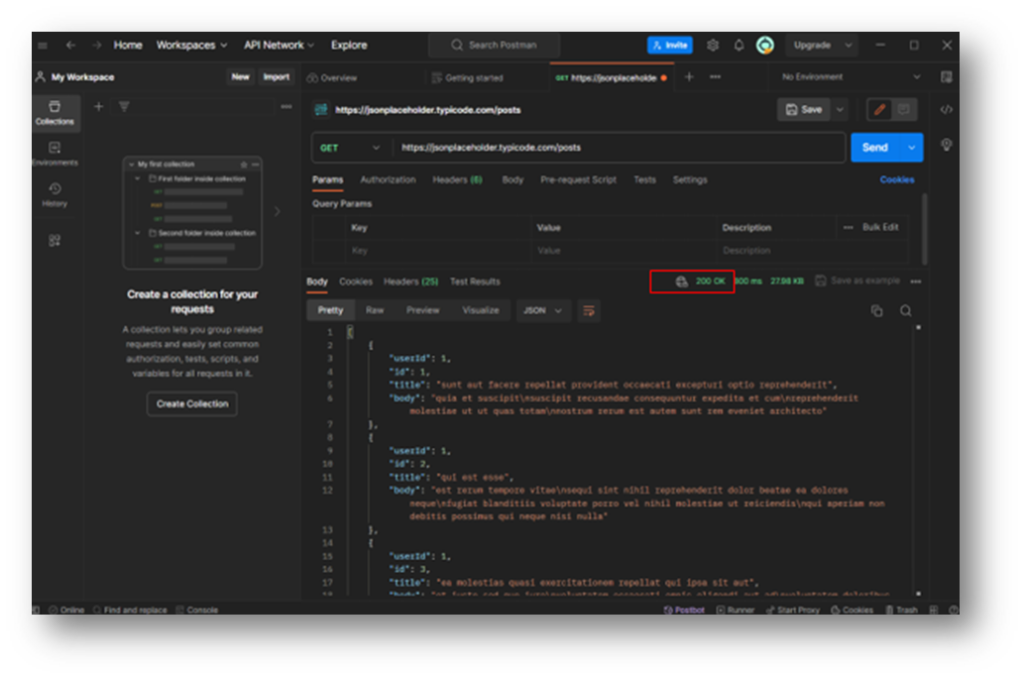
200 OK
- This status code signifies that the request was successful and that the server returned the required data.
6. Model Classes:
- Create model classes that represent the data structures used in the API responses. These classes will be used to parse the JSON or XML data received from the API into Java/Kotlin objects.
You can use Google just type JSON to Java/Kotlin converter.
Make sure that the variable name is same as the key(or variable) used in JSON.
data class User(val id: Int, val name: String, val email: String)7. Implement API Interface:
- Define an interface that describes the API endpoints and their corresponding HTTP methods (GET, POST, PUT, DELETE). In Retrofit, this is achieved using annotations to define the API interface.
import retrofit2.Call
import retrofit2.http.GET

interface MyApiService {
    @GET("endpoint_path") // Define your endpoint path here
    fun getData(): Call<YourDataModel> // Define the model for the expected response
}
8: Create Retrofit Instance
- Create a Retrofit instance that will serve as the entry point for API calls. Set up the base URL and specify converters.
object RetrofitClient {
    private const val BASE_URL = "https://api.example.com/"

    private val retrofit: Retrofit = Retrofit.Builder()
        .baseUrl(BASE_URL)
        .addConverterFactory(GsonConverterFactory.create())
        .build()

    val apiService: ApiService = retrofit.create(ApiService::class.java)
}
9:Make API Calls
- Now you can use the apiService instance created through Retrofit to make API calls. You’ll typically call these methods from within an appropriate context, like a ViewModel or a coroutine scope.
// Inside ViewModel or CoroutineScope
viewModelScope.launch {
    try {
        val response = RetrofitClient.apiService.fetchData()
        if (response.isSuccessful) {
            val data = response.body() // Access the response data
            // Handle the retrieved data here
        } else {
            // Handle unsuccessful response
        }
    } catch (e: Exception) {
        // Handle exceptions or network errors
    }
}
10.Handle API Responses:
- Process the data received from the API call according to your app’s requirements. You might parse the JSON response using GSON into your data model and update the UI or perform necessary actions based on the data received.
11.Handle Error Cases:
- Implement error handling for scenarios like network failures, server errors, or unsuccessful API responses. This includes handling exceptions, HTTP error codes, and providing appropriate feedback to users.
Note:
Replace “https://api.yourbaseurl.com/” with your actual API base URL.
Customize the endpoint paths, request types, and response models as per your API specifications.
Handle network operations on background threads to prevent blocking the UI thread.
Implement error handling and manage different response scenarios accordingly (e.g., HTTP errors, and connection issues).